

How To Shoot Film
Step 1 - Getting a camera
The most obvious step into shooting film, is getting your hands on a film camera. If you don’t want to buy one just yet, try lending one off a friend or having a look on ‘Fat Llama’.
You will most likely end up with a 35mm SLR camera, like the below:

Step 2 - Chosing film
The next step is chosing your film stock. You are looking for one of the three variants; Colour Negative (most common), Colour Positive (slide), or Black and White film (cheapest).
We would just recommend sticking to a well known stock like Kodak Gold 200, which is a colour negative film and is widely available.
When chosing a film stock, it’s good to remember that the ISO/ASA number reflects how sensitive to light the film is. Around 400 is good for all scenarios, and the lower the number, the better for brighter scenes, similarly, when using higher ISO films like Ilford Delta 3200, this is best used in darker scenes.
Step 3 - Loading film
Most SLR’s load the same way…
Follow this video below for a visual tutorial:
Step 4 - Setting up your camera
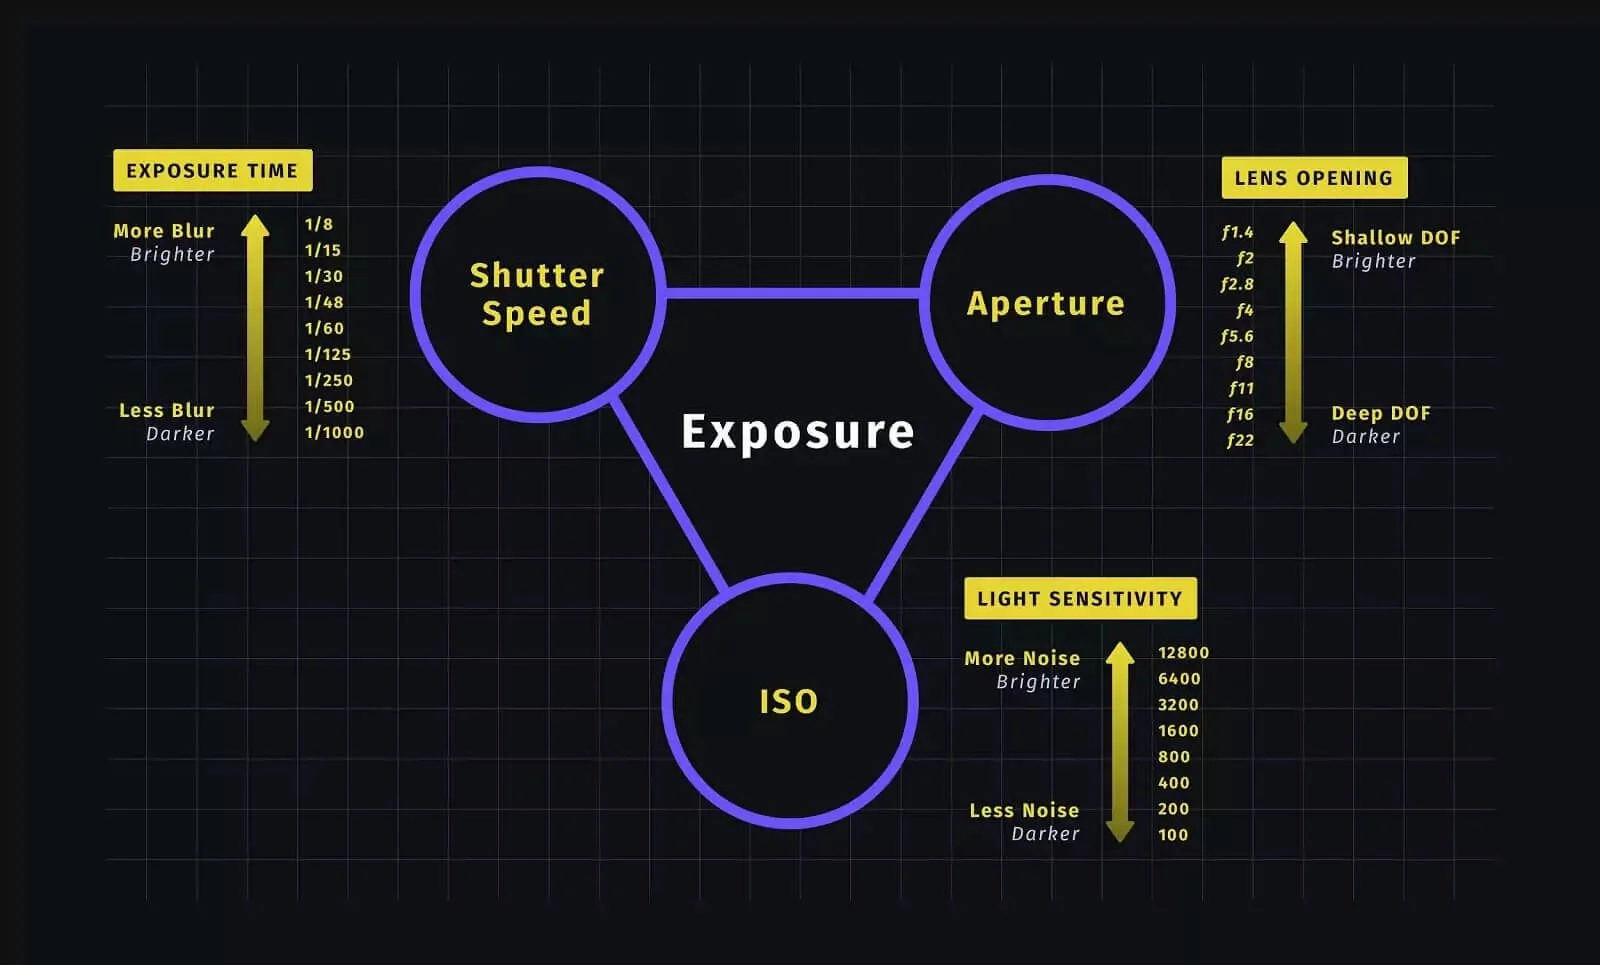
When setting up your camera, you will need to consider three variables:
Shutter speed
Aperture
ISO
These three things determine not only how much light gets let into the camera, but also how your images get exposed
Some more modern film cameras can read the DX code of the film canister, so theres no need to change the ISO manually, however, this may not always be the case.
The first thing you should do is to set the ISO of the camera to match the ISO of the film you’re using
This is a diagram of what’s called ‘The Exposure Triangle’:
Step 5 - Shoot the roll!
Now that you loaded your film into your camera and determined your settings, it’s finally time to shoot. Shooting film photography means being more intentional with every shot. After all, you can’t review your photo immediately after you take it.
You also will only have 24 or 36 shots per roll. The best way to learn is to go out and shoot out an entire roll. Bring your camera out when you’re hanging with your friends, take photos of landscapes, or simply shoot random street photography.
Step 6 - Finishing the roll
Once you’ve shot out an entire roll, it’s time to wind and unload your film. Properly winding your film is incredibly important because the second you open your camera, light enters it. If your film is not properly winded, your shots can become compromised.
Check this video out to learn how to properly wind and unload your film roll:
Step 7 - Developing your film
If the process of developing your own film sounds like too much of a daunting task, you can also opt to get your film developed by a lab like us!.
Head over to our Film Developing page, to find out more and place an order online.